 |
| Photo by learn-to-play-guitar.maxupdates.tv |

Monday, June 10, 2013
Wednesday, June 5, 2013
Fender Mustang II Review
 |
Fender Mustang II |
Price: $ 200
The world's best-selling amplifier series is back with new features, a new look and all the flexibility you've come to expect from a Fender® Mustang. The new Fender® Mustang V.2 amplifier series raises the standard for modern guitar versatility and muscle, including five new amp models, five new effects and intelligent pitch shifting. The new Mustang Series features USB connectivity and Fender® FUSE™ software, letting your musical creativity and imagination run wild.
Fender Mustang II is 40 watt amp. If you are looking for a practice amp that is loud enough for a band practice and also can be use at bedroom jams, this Fender Mustang II is great. It features a 24 presets, a tuner, footswitch, input jack, auxiliary input, headphone jack, and adjustable modulation, reverb and delay. It also has a USB cable to connect your Fender Mustang II to a computer via the Fender Fuse Software, which allows you to modify your presets amp models from large selection of amps like Fender Twin Reverb to modern high gain amps for metal. You can also apply many effects like delay, chorus, flanger, compressor, wah, overdrive, distortion etc..Getting a your desired tone may take some time, but it's worth it. The sound is great from Fender Cleans to Marshall Drive.
Specs:
Series: Mustang™
Amp Type: Solid State
Color: Black
Amp Length: 8.7"
Amp Width: 18.25"
Amp Height: 17.25"
Amp Weight: 24 lbs.
Speaker: One - 12" Fender® Special Design
Channels: One
Input: One 1/4"
Amp Covering: Carbon Tweed Textured Vinyl with Silver Grille Cloth
Control Panel: Black
Footswitch: Optional 1-Button Footswitch
Accessories: Optional 1-Button Footswitch for Toggling 2 Quick Access Presets (P/N 099-4049-000)
Other Features: Seventeen high-quality Fender and other amp models including five new ones, such as ’57 Twin and ‘60s Thrift; 24 onboard presets (unlimited storage with computer); a full palette of effects including reverb, delay/echo, tremolo, phaser, with additional new effects including Big Fuzz, Green Screamer and pitch shifting (with even more available through Fender® FUSE™); new low-noise power amp platform; chromatic tuner; USB connectivity for user programming and audio recording output; auxiliary input for media player; Fender® FUSE™ application for deep editing, preset storage, patch swapping and free artist content; Ableton® Live Lite 8 Fender® Edition studio-quality recording software compatible with Mustang USB recording output; AmpliTube® Fender® LE edition with free Fender® FUSE™ editor/librarian software for Mac and PC (makes Mustang ideal for guitarists new to digital recording).
How to Setup a Stratocaster

You will need:
1/8 and 1/16 Allen Wrench
Digital Tuner
Phillips Head Screwdriver
6" (150 mm) Ruler
Standard Guitar Capo
Make sure to follow these steps in order for best results.
1. Setup Truss The Rod
2. Adjust The Bridge Action
3. Setup The Guitar's Intonation
How to Adjust Bridge Action (Stratocaster)
Stratocasters has a individual saddles, which allows you to adjust the strings individually according to your taste. Adjusting guitar action can improve the feel of the instrument and how it sound. It's the distance between the bottom of the strings and the top of the fret. There is two types of action, low action and high action. Low action means the string is closer to the frets, which increase playability. It's easier to play a guitar that has a low action, because you don't need to put more pressure to play a note, it is good for beginners. But too much low action can cause fret buzzing and rattling sounds. High action will decrease the playability and increase sustain and has a better tone. Now I'm going to teach you on how to adjust your guitar action.
You will need:
6" (150 mm) Ruler
Allen Wrench (1/16")
Digital Tuner (Optional)
1. Check the tuning. Tune the guitar in pitch, you can use a tuner or you can tune it by your ear if you can.
2. Measure. Using the 6" (150 mm) Ruler, measure the distance between bottom of strings and top of the 17th fret. That should not be lower than 1.6 mm, to avoid fret buzzing. It's always better to experiment to achieve your desired feel and tone.
3. Adjust. Adjust the string height individually, using the allen wrench. Make sure you adjust the saddles proportionally, to avoid changing the string spacing. Experiment with the height until your desired sound and feel is achieved. The saddles should not be straight, because the frets are not straight, it has a radius. Here is a illustration of wrong saddles and correct saddles.
 |
WRONG |
 |
 Correct |
Sunday, June 2, 2013
Seymour Duncan SH-4 JB Review
Price: $83

Seymour Duncan SH-4 uses completely balanced coil configuration to produce great harmonics and high output with right blend of sustain and distortion, which makes this pickup great for everything from heavy blues to heavy metal. Provides slammin' output while retaining singing highs. Goes from sweet warm tone to raw rock'n' roll. Compared to the SH-12 Custom 5, the JB has a stronger treble detail. This is for bridge position. For complete setup, often a JB is paired with Jazz Model SH-2, which is called "Seymour's Favorite". Works specially well with rosewood fingerboards. These pickup totally transformed my Stratocaster, even if it has a maple fingerboard. This is a video of me playing Master of Puppets by Metallica, for you to hear the sound of my guitar, after I installed the Seymour Duncan JB SH-4 on it:
This pickup came nicely, packed with a foam in a plastic case. Comes with screws, springs and wiring diagram. When it comes to durability, it will last lifetime to your guitar. I'm really satisfied for the price I paid for it. It's so easy to install, I'm just 14 year old when I installed it myself. You'll just need a soldering iron and you only need to follow the instructions given in wiring diagram. This pickup comes with four conductor hookup cable. So If you want an all around pickup, I strongly suggest this Seymour Duncan SH-4 for you.
How to Perform Intonation Setup (Stratocaster)

Are you experiencing bad tuning on some fretted notes on your guitar, even if you tune it correctly? Maybe your guitar has a intonation problem. Now I'm going to show you steps how to adjust your guitar's intonation.
You will be needing:
Digital Tuner
Phillips Head Screwdriver
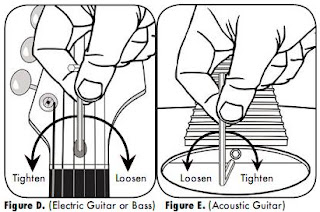
1. Check. Using a tuner, check first the intonation. Do an open/natural harmonic on the 12th fret (lightly touch the string to create a bell like tone) and compare it to the fretted note at the 12th fret. If the open/natural harmonic is higher than the fretted note or otherwise, your guitar's intonation is out.
You can fix these, by tightening or loosening the screws on the bridge saddles, in case you don't know what it's look like. Here it is:

2. Adjust. Using the tuner, tune the guitar into standard tuning and compare the open string to the fretted note at the 12th fret. If the fretted note at the 12th fret is sharp, that means the length of the string is too short, so we need to make it longer. To make it longer, loosen the screws on the bridge saddles, by turning it clockwise. If in your case the fretted note is flat, of course you need to turn the screws counter clockwise.

3. Tune & Check. Check if the fretted note at the 12th fret is already in tune.
4. Repeat the steps on the other strings.
Saturday, June 1, 2013
Things to Consider Before Buying Used Gears

Are you planning to buy a second hand gears from classified ads, forums, and online shop? Buying a second hand gears can help you to save money. But, this can lead to dissatisfaction and scams. Here are some tips on buying a second hand gears safely without wasting your money or being scammed.
1.Price. Expect that the price of the second hand item is lower than the brand new ones. Search for the original brand new price of the product on Google. Because some of the sellers, sell a second hand item in higher price than the price of the brand new, to a earn revenue. So it's good to know the original brand new price of the item first.
2.Seller's Information. Know the important information of the seller such as full name and exact address.Make sure that the item is really for sale, because some scammers are just getting a photos on the internet then sell it, some of this scammers are only requiring shipping, once you've already pay for it, they will not ship it to you, because there are no item to ship. You should check his/her feedback from other transactions, if you find out that his/her previous clients are not satisfied or being scammed, you should find another seller.
3.Looks. Expect that the item you will get is not good as brand new, because obviously that's a second hand item. If you are perfectionist, you should buy a brand new and don't buy second hand item, because that can't satisfy you.
4.Actual Pictures. Ask for actual pictures of the item, before going to meetups. If possible ask for pictures of the item in all angles. Inspect if there are cracks, scratches, issues etc. If it has scratches or other issues, that should be indicated on the condition of the product.
5.Test. In meetups, set a specific time and place to avoid wasting time. Test the product if it's good for you, inspect the product if it's already repaired. You can use a flashlight or other source of light, if you notice that there are some shiny scratches on the screws, that means the previous owner repaired it or opened it already.
Friday, May 31, 2013
6 Things That Guitar Players Should Bring on Gigs

Now I'm going show you most the important things to bring with you on gigs.
Compact LED Flashlight
Most stages are dark, especially in clubs, bars etc. It's good to bring a flashlight with you, just in case you need to get something in your bag that you thrown backstage or just in case you need to fix some cables, a powerful flashlight is very useful.
Spare Strings
This is very common to all guitar players, but this is for those who are not aware. It's advisable to put at-least a pair of strings on you gig bag every time you go out for gigs. Just in case you broke your string while tuning or playing in the gigs. You need to bring B and high E string, because this is prone to be broke.
This is very common to all guitar players, but this is for those who are not aware. It's advisable to put at-least a pair of strings on you gig bag every time you go out for gigs. Just in case you broke your string while tuning or playing in the gigs. You need to bring B and high E string, because this is prone to be broke.
Peg Winder
This one can really help you to save some time, when you broke your string and you need change it immediately, because the show is going to start in a minute. Using a peg winder is more easier, faster, and effortless, than turning the tuners manually using your hands.
Deep Socket
You should bring a specific socket for your guitar, because every guitar has a different sizes of knot. Deep Socket allows you to tighten the loose input jack of your guitar. Loose input jack may cause lost of signal from your guitar, this is common to guitars, especially on Stratocasters.
You should bring a specific socket for your guitar, because every guitar has a different sizes of knot. Deep Socket allows you to tighten the loose input jack of your guitar. Loose input jack may cause lost of signal from your guitar, this is common to guitars, especially on Stratocasters.
Screwdriver
You should bring a screwdriver, just in case your strap lock is loose and you need to tighten it up. You should bring a small size of it, that fits in your gig bag.
Wire Cutters
It's good to bring a pair of wire cutters, this is for cutting excess part of string after a string change. Excess string can bother you while you are playing.
Thursday, May 30, 2013
5 Tips on Learning a Guitar Solo

1. Familiarize. Listen to the solo, familiarize every note and try singing along with it. This helps you to internalize the melody and rhythm of the solo.You can also watch guitar cover of it and identify the finger positions.
2. Use Tabs or music sheets. This can help you in transcribing the solo. But, learning the solo with your ears is more recommended, because using your ears on learning a song can help you to improve your hearing, to have a good ears, which allows you to learn a song by simply listening to it. I didn't say that that using music sheets are bad, it's also good for those who have a short time.
3. Divide the solo. Divide the solo into pieces and learn it piece by piece by piece. Trying to learn to much is not effective. Learn the solo by piece, then connect the pieces to build a guitar solo.
4. Play Slowly First. Play slowly to train your fingers so that they know the correct way to play it. Playing the solo slowly can help your fingers to be familiar to the feels and patterns of the solo.Once you have done this, try to increase the speed.Yo can use a metronome for the tempo.
5. Clean sloppy parts. Once you already know how to play it, but not perfectly. Focus on the parts that are giving you trouble, try to master it. By playing it few times or identify the problem, why you are not able to play it correctly and try to make a techniques/strategy to play it perfectly.
Wednesday, May 29, 2013
5 Tips on Playing Guitar In Live Performances

1.Warm up. You warm up first, do some riffs and scales. And before tuning, warm up the strings by playing some riffs. Because metal extends when they are heated up and that can affect your tuning. Set your effects and volume properly. Make sure that you do a decent sound check - it'll save your life when you perform. It is essential that everyone can have good control over his personal instrument and can also hear the others around.
2.Put on your strap during your rehearsals. Play while standing, this is very effective, because it can simulate how are you going to play in your live performances. Some guitarists are experiencing difficulty especially in their guitar solos, because they practiced to play that solo while sitting. So when the time of their performances, they can't play that song perfect and the way it should be, because they are not trained to play like that (Play while standing).The stage is very different from your bedroom or practice place.
3.Adjust the level of your guitar strap. Adjust the strap to the level that you are comfortable most. Don't adjust the strap level very low, just because you want to look like Slash and just because it looks cool. Adjust your strap to the comfortable level, even if that is really low or high, as long as you are comfortable, it's okay.
4.Relax. Just relax and feel what you are playing. Just have a good time and it will show in the performance. Every time you perform, do your very best. Imagine that this is your last performance.
5.Stage presence. Move around, if you have stage space use it. Don't try to do anything too stupid that you're not comfortable with. Just have a good time and it will show in the performance. Maybe have some cool groove going while you introduce the band and after a member's name is announced, and do some cool riffs/ licks. That always seems to impress.
Tuesday, May 28, 2013
How to Fix Loose Whammy Bar

Having a loose whammy bar is really frustrating. You are not a able to do a perfect and clean vibrato, because of this loose whammy bar. Don't worry many guitar players are experiencing this kind of problem. You can't fix this problem by only tightening the whammy/ tremolo bar all the way down. Now I will going to show you the solution for this, which I've learned from Justin Sandercoe.
You will need:
 PTFE Tape/ Plumber's Tape

1.Take off the whammy bar on the guitar.
2. Simply wrap a little of amount Plumber's Tape around the end of the whammy bar at the thread part, like this.

3. Put back the whammy bar in place and your done!
Here is a video from Justin Sandercoe:
How to Fix Fret Buzz
Fret Buzz

Fret Buzz - This happens when a string comes in contact with a fret and a buzzing sound occurs. This is the most frequent cause of annoying buzzes. Fret buzz is one of the common problems of guitars, if you are experiencing this, don't worry, because you are not alone. Fret buzz is also common to new guitars, because some new guitars did not undergo proper set up.
You can fix fret buzz, by setting the up the guitar or by simply increasing the action. Now I'm going show you the symptoms, possible cause, and the solution for it.
| Symptom | Possible Cause | Remedy |
|---|---|---|
Open String Buzz
Buzzes when played open, stops when string is fretted.
|
Nut
Worn or poorly cut nut slot is placing the strings too close to the frets near the nut.
|
Replace nut or shim to add height. Set up instrument properly.
|
One Spot Buzz
Buzzes on one note, or one area but stops when moving away from that spot.
|
Frets
Frets are not level, one or more is too high/low. Loose or sprung fret is rising out of the fingerboard. Hump in fingerboard. Wear or deep grooves in frets.
|
Secure all loose frets, level and dress. Fret leveling and/or replacement of worn frets.
|
Upper Fret Buzz
Buzzes where the neck attaches to the body. Notes seem to fret out when playing near the body.
|
Fingerboard
On acoustics, section of fingerboard that is glued to the top may rise/fall with temperature/moisture extremes due to changes in the top.
Fingerboard is warped in a way to render the end too high (most common on archtop's).
|
Evaluate for dryness, humidify if necessary.
Frets near f/b extension may need leveling.
In rare cases the board must be planed to remove hump.
|
Buzzes When I Strum Hard
Buzzing occurs when strumming or picking aggressively but can be silenced when playing lightly.
|
Set Up
Insufficient relief in the neck.
Poor set up.
String gauge too light.
|
Adjust truss rod.
Set up instrument properly.
Use heavier strings.
|
Buzzes Everywhere
Buzzes nearly everywhere even though it is set up properly, will often disappear if string is fretted hard or closer to the fret and plucked softly.
|
Frets
Frets may be worn out or too low.
Very small fret wire used.
|
Replace frets.
|
Frets Out
Buzzes nearly everywhere all the time, strings are literally touching the frets in the center or other area of the fingerboard.
|
Neck
Truss rod may be way too tight back bowing the neck.
Neck could be a warped, or have excess back bow even after truss rod is loosened.
|
Set up instrument properly.
Adjust truss rod for more relief.
Use heavier strings if relief can not be created thru truss rod adjustment.
|
Monday, May 27, 2013
Ways to Improve Guitar Playing
Ways to Improve Your Guitar Playing


1. Know what is your genre. Knowing the type of music you want can help you to focus and to have a direction to your goal. Know if you want to play jazz, rock, metal, reggae etc. Choose the type of music that you are comfortable with, the type of music that you think you are the best when it comes to it.
2. Set a time of practice. Because some of us have responsibilities in life, choose a time which is yours, the time that you are not thinking about your works, problems, or other things. Just focus in practicing and focus in achieving your goal.
3.Focus.When practicing, do not waste your time in playing non-sense. Try to develop new skills and techniques. It's also great to play some piece that can help you to develop more techniques. Try "My Sharona" for alternate picking. You can choose songs that have a different techniques into it according to your genre.
4. Make a practice routine daily. Divide your time in practicing, for example.Warm up - 10 mins. Chords - 10 mins. Legato - 40 mins. Sweep Picking - 1 hr. Scales - 1 hr.
5. Always feel what you are playing. It's better to play slow with soul, than playing so fast without feeling it. Remember, "Speed is not always a measure for the best". Don't use expensive gears as a substitute for skills. To copy the tone of one guitar player, you must copy first the feel, accent, etc. Because everyone has different tone in our fingers. So copy and study first the way he/she play before buying their signature gears.
If this post is helpful. Please share.
Sunday, May 26, 2013
How To Setup Truss Rod Without Feeler Gauges
Truss Rod Adjustment without Feeler Gauges

Do you experience a lot of fret buzz or are your struggling in playing your guitar, because of its very high action? If you are not comfortable with your guitar action and it does not sound and feel the way it was before. I think you need to adjust the truss rod the way it should be. But, what if you do not have tools to use? Like feeler gauges, which a lot of setup tutorials requires. Don't worry this post can solve your problem.
You will need:
Standard Capo
1/8" Allen Wrench
D'addario Packaging Card (You can use a business card for high action setup. It depends in your preference)
First, tune the guitar. Put the capo on the first fret and press the sixth string at the 17th fret (where the neck meets the body). Using the card, measure the gap between the bottom of the sixth string and the 7th fret, like this:

The card should fit between the sixth string and the 7th fret, without lifting the strings. If the card is lifting the string, you should loosen the truss rod and if there is a gap tighten the truss rod with the allen wrench.

Adjust the truss rod in small turn at a time, and allow time for the wood to settle before adjusting again. Check the tuning, and measure the gap again. Until you achieve your desired action.
If this post is helpful, please share.
Comment for any suggestions.
Saturday, May 25, 2013
Setting Up a Multiple Effects
We all know that stompboxes are great. They sound better than multiple effects.
But, what if you can't afford them, even the amplifiers and cabinets? Using a multiple effects can be helpful for those who can't afford expensive amps and cabs, because most of multiple effects have a amp modeling and amp simulator, which allows you to tweak like a real amp and simulate the sounds of expensive amps and cabs that you can't afford.

Do you have a multiple effects unit? But, you can't create a patch that you are looking for? Here's some guides that may help you.
1.Effects List. If you're copying a tone from a song, listen to the that song and try to recognize the effects that were used in every part of the song. For example, the guitarist uses mild distortion, delay and reverb on the solo part. You need take that down, because it's not easy to copy, if you don't know what to copy.
2.Choose an amp and cabinet to use. Adjust the parameters or the knobs and make your clean tone. You should set the amp first, because this the foundation of your tone. You can't have a good tone, without setting your amp properly first.
3. Apply the Drive, such as overdrive, distortion, fuzz etc. Do not apply extreme amount of gain. Apply exact amount only, if you think that is not enough. Don't worry, that will sound heavier with bass and drums. I used to do it when I was starting, I always crank the gain in order to get good metal sound. Then I realized , I must focus in the frequencies.
You need to put drive before the other effects like modulations, delays, etc. Because it's hard to tweak the distortions when there is delay, flanger, phaser, etc. You need to hear the drive alone to set it to the way you want it to be.
4. Then apply the compressors, chorus, flanger, phaser etc.
5. Apply the delay and reverb. It's good to apply delay and reverb to solos to make it more colorful. Make sure that the volume of the feedback is lower than the normal notes you are playing.
You can make your tone in different ways, without following these steps. But, I think these method is easier and more effective.
Friday, May 24, 2013
Max Rufo's Custom Guitars and Basses
Some guitar players are not comfortable with their guitars even if they already have a guitar that is so expensive. If you are one of this, I think you should try to customize your own guitar, which you are the one to choose for the pickups, or you can just describe the tone you like and the luthier will do it for you or you can just choose pickups like dimarzio, seymour duncan, EMG etc to install to your guitar. You are the one to choose for the wood. Do you want a mahogany body, maple, basswood, alder or ash? Do you want a maple neck or mahogany, with rosewood, maple, ebony fingerboard? And customizing guitar is very expensive these days. I'd like you to meet the luthier can make these things posibble at very affordable price, Max Rufo!
Max Rufo a.k.a Mang Max is a luthier from Malabon City, Philippines who makes quality custom guitars and basses at very affordable price. He really had the knowledge about guitars. So if you want a quality guitar or bass and you have a low budget. I strongly suggest mang max for you. He also do guitar restoration, repainting, setup, modification, repair and custom guitar pickups. If you want a customized guitar, mang max can give you that at ₱8000-10000 ( $195- 240) and guitar repainting only costs ₱2000 ($50).
Here's his exact address:
Here are some Max Rufo's Custom Guitars and Basses:


 |
| Max Rufo's PRS Copy |
 |
| Custom Flat Top Stratocaster |
 |
| Custom Flying V |
 |
| Max Rufo's Iceman Copy |
 |
| Custom Les Paul |
 |
Thursday, May 23, 2013
M.V Electronics Shredhead Review
Shredhead by: M.V. Electronics


M.V. Electronics is owned by Mark Virata from Manila, Philippines. At first, Mark designed the Shredhead for himself, because he couldn't find the tone he was looking for. After some exposure, it became popular and it's being used by some artist here in Manila. He has already sold hundreds of units
Shredhead is a Marshall 6100LM in a box. It was built in a durable metal enclosure.
It features a volume, gain, tone and presence knob which allows to go everything from light cruch to heavy rock sound. It is simple to use and has a great sound. It runs from 9v to 18v, the 18v capability gives the pedal more volume and dynamics. Mark is selling the shredhead at very reasonable price. You should give it a try, it's a great pedal. He also do great pedal mods at very affordable price.
Contact Markv:
Email: ibzmav@gmail.com
Facebook: Markv Tonescientist
Here is a great demo from Brett Kingman:
Wednesday, May 22, 2013
How To Setup A Pedalboard
When Setting up a pedalboard, you must start with Tuner --Wah--Tone Shapers/ Compressors (acoustic simulator,equalizers, etc.) -- Drive Pedal (such as Overdrive, gain boosters, distortions, fuzz etc) -- and then your Modulation ( like tremolo, chorus,) -- Delay/Reverb. Your Setup should be look something like this:

Note: This is only the Basic Pedalboard Setup.
Tips on Buying Your First Electric Guitar
"Buying your very first guitar can be a thrilling experience.
Because of excitement, some people don't even check the quality
of the guitar, sometimes they buy the first guitar they pick up in the music store or the first guitar suggested by the sales person."

Things you need to do before buying your first electric guitar:
1. Research. Internet helps a lot when you are not expert about guitars. Determine what is the genre you play to be able to pick the right model in your budget.
2.Determine which store offers the best price and has the widest selection of what you like.
3.Specifications Check.Check the type of wood used for the body, the neck and fingerboard (ex. Fender uses Maple neck with either a Maple or Rosewood fingerboard); the shape or construction of the body (Strat, Les Paul, SG, Tele Shape, Solid body, semi-hollow etc.) Check the type of neck. (Bolt-on. glue-on, neck-through)
Check the type of pickups used on the guitar.
Single Coil pickups traditionally used on Fender Stratocasters,
it is a thin and bright sounding pickups.
Humbucker pickups is a hum cancellation used by Gibson
and has a warm, muddy and deep sound.
4.Quality Check. Try to feel the guitar first and check on the craftmanship, check on the weight too. Don't plug the electric in an amp. Try to play with the guitar first with no amplification. Check if the resonance is ok. Check the action, the frets, neck relief, check each note when fretted. Chime the notes on possible frets, check if it's ok.
5.Test. Don't buy the first guitar you pick up. Play several different models. Remember, every instrument is different. Find one that not only looks and sounds good, but one that feels good in your hands. Make sure all strings ring out with no buzzing. If possible, bring an experienced guitarist along. Forget the word "not bad", because the guitar should be perfect for your hands and ear.Test and test bunch of guitars within your price range.
6.Don't buy all extras. All you need is spare strings (specially the high E string), clip-on tuner, guitar picks, strap, and a small practice amp. And you'll also be needing cable.
If possible, bring an experienced guitarist along.
Tuesday, May 21, 2013
Multiple Effects or Analogue Pedals?
As a guitarist, it is very likely come to your mind "Should I use Multiple Effects or Multiple Analogue Pedals?"
.jpg)

.jpg)
In case you don't know what multiple effects and single pedals are, here are the examples:
MULTIPLE EFFECTS
RP-1000
GT-100
Multiple effects is a floor-based multi-effects processor. From the word "Multiple" it has a built in effects like distortion, delay, reverb, chorus, compressor. Which you can add or edit to make your desired tone.
ANALOGUE PEDAL:
Tube Screamer
Analouge Pedals feature only one effect like distortion, delay, reverb, chorus, compressor, which you can mix or chain to get your tone.
Now I'm going to tell you the Pro's and Con's of Multiple Effects and Analouge Pedals.
Let's start with MULTIPLE EFFECTS:
PRO'S:
CHEAP
This is so obvious isn't it? But I'll explain it anyways.
It's cheap, because you only have to buy one multiple effects
and that already features hundreds of effects, that means you don't have to
buy hundreds of single pedal. An average single pedal costs about $100
and a multiple effects unit runs for about $400-600.
buy hundreds of single pedal. An average single pedal costs about $100
and a multiple effects unit runs for about $400-600.
EASY TO CARRY
It is more lightweight than the pedalboard. You don't have to carry a
heavy flightcase for your pedals. All you have to do is to put it in the bag
and you're ready to go. And you only need two cables for input and
output, unlike with the single pedals which requires 10-20 patch cables
to chain them all.
heavy flightcase for your pedals. All you have to do is to put it in the bag
and you're ready to go. And you only need two cables for input and
output, unlike with the single pedals which requires 10-20 patch cables
to chain them all.
ENERGY EFFICIENT
You only need 1 plug in to power your entire unit.
PATCHES
You can make a certain "patch" for your songs and you only have
to push down one button and you'll be able to use different tone in
just seconds. Unlike single pedals, you need to stomp
to push down one button and you'll be able to use different tone in
just seconds. Unlike single pedals, you need to stomp
on 3-4 pedals in order to change your tone, which is really challenging
when you are soloing.
when you are soloing.
CON'S:
SOUNDS LIKE DIGITAL
We all know that multiple effects only simulate amplifier's tone and
analog's tone. Simulated tone will never be as good as the original.
analog's tone. Simulated tone will never be as good as the original.
DIFFICULT TO TWEAK
It's much easier to turn a knob on a single pedal in order to make
your tone than to enter patch settings and find what effects to change etc.
your tone than to enter patch settings and find what effects to change etc.
UNDEPENDABLE
Multiple effects are prone to fried ICs and overheating.
This is unreliable, because it might be problem for you when you are in the
middle of the show and it suddenly turned off and didn't work again.
This is unreliable, because it might be problem for you when you are in the
middle of the show and it suddenly turned off and didn't work again.
I experienced this one year ago with my BOSS ME - 25, during my rehearsals
for a band contest, it suddenly turned off and when I tried to power it on it didn't
work anymore. I sent it to a repair shop and they said that it has an IC problem
and that the IC has to be replaced. The problem is, there is no replacement
for it.
for a band contest, it suddenly turned off and when I tried to power it on it didn't
work anymore. I sent it to a repair shop and they said that it has an IC problem
and that the IC has to be replaced. The problem is, there is no replacement
for it.
ANALOGUE PEDALS
PRO'S
EASY TO TWEAK
It is easier to find your tone, because you only have 3-4 knobs to tweak it.
BETTER TONE
It has a better tone than the digital ones because it's analogue and it has an
authentic tone which is only simulated by the multiple effects.
authentic tone which is only simulated by the multiple effects.
DURABLE
It is durable, because mostly it is in metal cases. It does not have fragile LCD
or LED screen like the multiple effects. Even if you drop it occasionally,
it will not be broken easily.
or LED screen like the multiple effects. Even if you drop it occasionally,
it will not be broken easily.
CON'S:
EXPENSIVE
You need to buy every effects you need and
every pedal costs an average of $100.
every pedal costs an average of $100.
HEAVY
It is very difficult to carry a guitar plus a 20 pedals that weighs 1 pound each.
Especially when don't have a car when you go to gigs.
Especially when don't have a car when you go to gigs.
MORE CABLES NEEDED
You need a lot of cables to chain them all.
Unlike with the multiple effects, you only need two.
Unlike with the multiple effects, you only need two.
Subscribe to:
Comments (Atom)